Ideas for the Baby’s Room

One of the great and exciting things about being pregnant is decorating the nursery.  I had a lot of fun the first time and now that I am experienced I have even more ideas!

A little background on the upstairs of our house; we have four bedrooms upstairs, our master bedroom plus two rooms about the same size and one smaller one.  Originally I put Gabs in the room closest to our bedroom because I thought it would be a couple years before we had another baby.  Well SURPRISE, we do not have that much time.  So, last weekend Gabs moved into the other larger room across the hall (I was a little worried but Gabs is adjusting well to the move, I’m not sure she even noticed the change.)

Here is what the room looked like while Gabs was still in it:

White Baby Room

White Nursery

I think the general arrangement will be the same.  Another angle:

White Nursery 2

White Nursery 2

The dresser is actually Gab’s and has already been moved into her new room.  I am going to move the changing table back in here that matches the crib set.  The fabric on the chair was my previous inpiration, but I have changed my mind since then.

The room is a very blank canvas; really, incredibly, white.  Which I suppose is good nothing strange to hide or change from the previous owner.

My paint vision is a darker pink, like this:

Pink Wall Color Inspiration found on BabyCenter.com

Pink Wall Color Inspiration found on BabyCenter.com

Pink Nursery found here.

I want to make sure that the pink has a good gray undertone so it is not too bright or bold. With the white trim, white doors, white furniture and white fan the room can pull off some color.  I told Hubs it was going to be pink but I do not think he knows how dark, anyway it is just paint and can always be changed if it is too dark.

The bookcase is really cheap from target. (I think it was $25 around back to college time.)  I am thinking of taking the animal wrapping paper off the back and stenciling a geometric design in mostly white, but with a bold accent color. Also Censational girl recently blogged about covering holes with spackling to make a bookcase look more custom, which I definetly want to copy.  Plus I would also like to add a little bit of trim to the top and edges.

I was inspired by this canvas on project nursery:

Wall Decor Inspiration

Wall Decor Inspiration

Actually I this room was a little bit of deja vu evoking.  The layout of the room is exactly like my nursery and the furniture was arrnaged in exactly the same way as mine.  Plus I have the same rocking chair.  Weird, or at least I found it weird.  Anyway, back to the canvas, I wanted to put something very colorful above the crib, but nothing heavy incase that it falls.  I am thinking of cutting silhouettes of flowers out of coordinating fabric and heat bonding and possibly stitching them on to a larger piece of fabric.  Then either stretching it over a thin frame or over a cork or foam board.  Also I’m not sure if I will do one big board or 3 long thin ones.  I guess I am still in brainstorming mode for this one.

Window Treatment inspiration

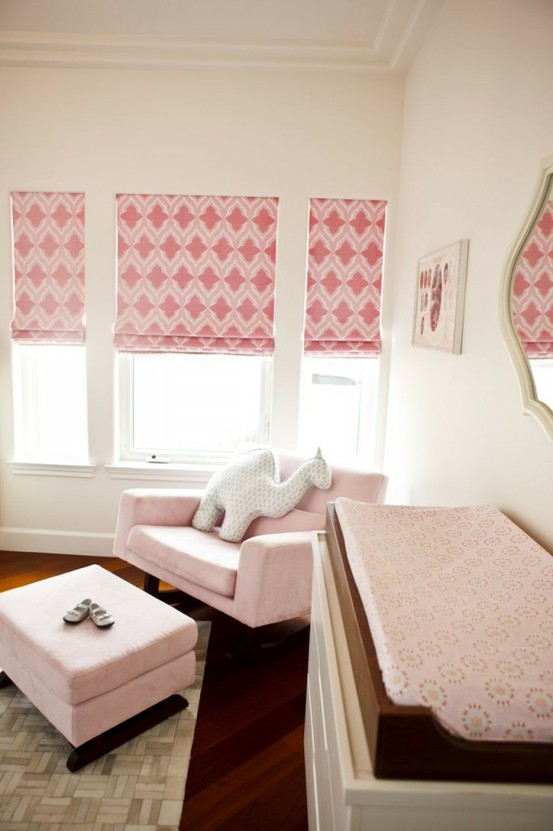
Window Treeatment inspiration

I found this picture on project nursery and love the pattern on the shades.  I am thinking of doing something similar with a faux shade, but hopefully I can find a pattern that is reverse of this one; with more white and the details in pink.  Also I love the little pattern on the changing table pad.

I still do not know what to put over the changing table.  I have a collection of white display shelves that might work with some frames or canvases.

Anyone have experience decorating a second nursery?  Was it more fun, easier, or did you use your first nursery?

Hello!

Hello, I’m back!

Things were a little hectic for a while (many new things.)  I started a new job which brings many other new things and we found out that we will be having a new little one in the end of March.  Which is very excited, but it made me very sick for a while, which kept me confined to the couch for a few months.  I’m feeling great now and adjusted to my new job, so I am ready to re-join the blogging community.

I know it is a little late for New Year’s resolutions, anyway I guess mine is more of a goal anyway.  My huge project is to paint and move all 4 of our bedrooms around upstairs before the new baby is born.  Currently our 18 month old is in the bedroom closet to our room and we have two guest rooms.  I want to move her into the larger of the two guest rooms and move the guest furniture to the other room.

So far I have painted our room, but it needs decorating, since it is huge and there is nothing on the wall:

Gab’s new room needs the queen bed moved out. The wall color is rather neutral, so I just need to move her dresser, buy a bed and decorate:

I just finished painting the smaller guest room.  It is currently has a twin bed, which I need to have moved down to the playroom and move the queen bed in here and decorate:

Lastly, I need to paint the baby’s room, and move all the baby stuff in here from the basement and decorate:

So here is the grand list in order:

  • Move contents of guest room downstairs
  • Move queen bed and night table into the guest room
  • Move Gabs dresser and crib (temporarily) into her new room
  • Paint baby’s room
  • Move everything back in Baby’s room
  • Decorate all 4 bedrooms

Whew!  I’m being positive and I think it can be done before March 28th!

Do you think I can do it? Do you normally meet your goals, or do your goals become more realistic as the deadline approaches?

Guest room in progress

Guest room in progress

Guest Bathroom

I know that I have been MIA for a week and half, but things got crazy again.  We moved into our new house and I am finally able to see the light from unpacking and and organizing.  In the middle of everything my parents came into town for memorial day weekend and I have been interviewing for jobs.  So, even though I am not working I am so busy!

Anyway, I would like to share the one room that is ‘done’ for now.  The previous owner painted the room a nice neutral color that matched my new shower curtain that I had purchased for staging my old house.  There was no hand towel or bath towel hook or rack, which was really strange.  I think that the previous owners did not have children using that bathroom, because I don’t know how you have a bathroom with out towel racks.  (Also strange was that there was no toilet paper holder in the master bathroom.)  So we went to Homegoods and bought some nice holders for very reasonable prices and installed them.  Seriously it took only about an hour to install all three.

Here are the new Pics:

I like that this bathroom has a window in it, when we were looking at houses this was one of the pluses of this house.  Even the nail on the wall for the picture was in a decent spot, so I used the picture that I had in my family room bathroom from the old house.  The thing that I don’t understand from this bathroom are all the builder grade features.  The rest of the house has granite and cherry cabinets, and upgrade light fixtures.   Actually it is probably difficult to see in the pictures but the floor has a very standard almost dated, pink tile that continues through to the back of the tub, which is weird since the house was just built 5 years ago.  Anyway there plans for this bathroom, but for the present it is good.

This picture shows off my new towel holders.  There really wasn’t a place for a bath towel rack, and since for right now this is just a guest bathroom, we installed a towel hook.  This picture also shows off my bathroom closet, which I love.  Although with 4 bathrooms in the house and three of them full, I am a little short on towels.  So, I guess the closet isn’t very full, but we have lots of storage when we need it.

I know not all that exciting, since I didn’t do much in here, but it is a start.  It is great to have one room organized.  I am currently working on the office, but it is a diaster.  I found a color that I love, but I ran out of paint, so I had it mixed again and I waited a couple of days before I had time to paint again.  I stirred the paint and painted a second coat, but it was too dark, which upset me since I had the can from Lowe’s and gave it to the paint lady and she mixed it exactly to the previous formula.  So after a day or two of grumpiness, I sucked it up and touched it up, but the color was too light.  So now I think it was my fault for not stirring the paint properly.  I hope that is the problem.  I have painted soooooo many rooms before and never run into this problem. Look:

It is a little difficult to see in the picture, but it looks bad!  So FRUSTRATING!!!  Anyway I guess the plan is to get another gallon of paint and paint immediately after it is mixed in the store.  Anyone else have this happen to them?  What did you do?


Thrifting

Since I have had quite a bit of time on my hands, but not loads of money to entertain myself, I have been thrifting my way through the Detroit metro.  I have gone to all the thrift stores with in a 20 mile radius, and I have had soooo much fun.  I guess I love the thrill of finding treasures and even more with my new house to fill.  So here are a few of my favorite ‘treasures’ that I found:

This vase was marked as $6 which I thought was a steal for something that I did not have to alter (I think it is from Target originally), but when I got to the front it was 50%.  Wahooo!  I did not realize that all the decorative items were 50% I would have bought sooo much more if I had known while I was browsing, but the baby was getting fussy by the time I was checking out.

This frame I bought for $1, because it had the 1/2 off sticker color of the week.  It says on the back that it was handmade from driftwood.  It doesn’t look so bad in the picture, but it is pretty dinged up, so I am going to paint it when I have time.  I have been eyeing these frames from Pottery Barn Kids:

I think that with some paint this frame could look very similar, the problem is that I forgot to pack paint brushes and painters tape.  Also, I have resolved to not buy things that I know I have at our other house so I will just have to wait until Sunday when my things are being moved into our new house!

This was my first thrifting purchase here.  I could not resist, although now I am working through some ideas for Gab’s room and it doesn’t fit the color scheme.  I know I can put it in the play room in the basement.  It is so cute I almost don’t want to use it as a cubby/shelf because then the turtle will be hidden.

While I am on finds for Gabs, here are things I found while sort-of-thrifting:

It was more like dumpster diving.  I was out walking the dog and I saw these in another apartment’s trash.  First I wondered whether they were really throwing these away, and then the next time I walked the dog I decided that since they were still there it was a sign.  So I grabbed them and went running to my apartment (I know I looked so creepy).  They were covered in fur and a little bit stained, but nothing that a little vacuuming and cleaning didn’t undo.  Besides these I also found this:

It also had all the bins that fit on it.  One dowel was missing and another one was broken, but that is a really easy fix once we get in the house.  I’m thinking of putting this downstairs in our new basement playroom.  Anyway if this was your garage, I swear I am not crazy.  I just thought that I could use it.

Have any of you gone dumpster diving?

Pillows

I have had quite a bit of free time lately and no house to work on, so I have been making pillows galore.  The first one I made, I saw in blue at Kohl’s and love the idea for the design.  I was thinking of making it in a mustard color, but when I got to Joann’s I found a very limited selection of felt, so I choose the dark red felt.

In the end I loved the pattern, but was not all that happy with the color.  I think I might give this one to my mom and try again in a different color.  (Please excuse the backgrounds, that was the best I could do in my corporate housing.)

This pillow I used my Martha Stewart stencil.  I bought yellow fabric, stenciled the pattern and then once it was completely dry I stitched it together, leaving a one inch border.  I thought the yellow was a little bright at first, but with all the white it really toned it down.  I even, don’t mind where my stenciling was a little faint, gives it character!

I saw something really similar at the pottery barn outlet, but it was $20 for the pillow cover (I know it was not even that expensive) but I refuse to buy pillows.  I made this pillow for $4 with everything.  I have been buying all my inserts at Goodwill; I buy an old, ugly pillows, wash it and cover it.  The fabric I found in the remnants bin at Joann’s for $2 and the button was $1. I made the pillow, envelope style, with minimal sewing.  I like the end result, although I have no idea where I will use it.

I also saw a pillow similar to this at the pottery barn outlet and decided to make it.  This one was not quite as cheap, around $7.  I got a 1/2 a yard of linen fabric and it was barely enough, I had to get creative with some of the fabric pieces I cut in order to make them fit.  Also, I love these buttons, they are real wood and sooo cute ($1.25, Joann’s).

Here are all the pillows together.  Now, I just need to find places for them in the new house!

Anyone else feel bad about buying pillows, even when they are affordable?

Family Room Transformation

There was one room in my house that I dreaded painting, because it was just so much surface area.  That would be my family room, it was humongous.  It was the size of the three bedrooms plus the hall combine, also with built-ins, deep windows, and lots and lots of trim.  I started this project shortly after finding out that I was pregnant (getting no VOC paint, paint from Lowes) and did not finish until almost a year and a half later.  In the end the process was significantly accelerated due to the the home sale.   I really did have a lot more intricate plan for this room, but since I had to finish and in a staging way, it got done really fast!  Even with all that, after everything I really did like the result.

Here is a before picture (again sorry for the poor quality before pictures, note to self in new house take good before pictures):

and here is the two year later after:

I painted the built-ins, and Hubs installed a TV above the fireplace.  (Don’t worry about the heat, we have never used the fireplace)  Also we had gotten new carpets, almost right after we moved in.  I think the previous owner had a couple of dogs and it had a yucky doggie smell.  I really had wanted to put some dark bamboo blinds in the room, but in the time, money crunch we had to just go with standard aluminum white blinds.  I painted this focal wall with a chocolate brown and the rest of the walls I used the same neutral color that I had used in the kitchen, since one of the walls is continuous.

here is another before from the other direction:

And the after:

I really like the look of the bookshelves and it wasn’t even my idea.  Hubs thought of it as a way to use the awkward space behind the sectional.  The bookshelves are from target and we paid $87 a piece for them, actually a Christmas present from my parents.  (I have good ideas for these in our new house.)  I am not really a fan of the matchy, matchy pillows on the couch matching my ‘fun chair’ but hubs was in a decorating mood and ordered them on the internet.

Here is a picture of the bar area.  You can see where my 9 squares project went.  Sorry about the dog crate in the background, I’m so used to seeing it I forgot to take it out. My original plane was to paint the bar and update the countertop, but there was no time, and the good thing is that you cannot see the bar when you walk down the stairs.

Overall I am soo happy that I finally finished, but a little sad that I did not do it sooner, we only enjoyed the finished project for about a week.  Although thanks to all my blog reading I have finally perfected the painted transition between two colors. Yahhhh!

Has anyone else been forced to finish projects faster due to selling a house?

TDC Before and After

Bathroom Update

I know I have been gone for awhile, but everything got really crazy all at once!  For a couple of weeks in the beginning of March we went to visit Hub’s family and introduce Gabs in Colombia.  It was so wonderful and oh so warm!

There is my sleeping beauty taking a name on Hubs at the resort.

Then when hubs checked his messages back in the states, he had one from a company in the Detroit metro offering him a position at their company.  Long story short (and lots of craziness in between) in 4 weeks we put the house on the market, moved into corporate housing, found a new house, and have a closing date in two weeks.  That would be the reason there are no posts for such a long time.  We had mixed feelings about our departure, it was sad to leave our house, our jobs, our friends and family, but also nice to have fresh start and lots of new oppurtunities.  We left the house that we have put soooo much work into, but on the upside we are buying a much nicer, newer and way larger house.

One thing the move did was force me to finish all my house projects.  I found that it was much easier to make house decisions thinking about it as staging instead our home decor.  One of the rooms that went from just some ideas to finished in less than a week was our upstairs bathroom.  Do you remember what it looked like before?

It is a very long, thin room, and very difficult to photograph.  This is from the entrance and here is a picture of the vanity:

I tore the border down, which was really not difficult at all.  I think that all the moisture from steam in the bathroom had really helped loosen it up, because by far it was the easiest border to remove in the whole house. Then I removed all the cabinet doors and drawers, painted them and the cabinet backs, plus the trim.  I ended up painting the vanity a dark brown instead of my usual white because I did not want to change the white counter-top.  Then I painted the room a very neutral color and here is the final result:

I covered the eighties style shower doors with a blue shower curtain from Kohl’s and finally installed the bamboo shade.

You can see the painted vanity a little bit in this picture.  I didn’t change the light or the mirror, but I did install a new towel rack.  Actually I got a really good deal on that one, $10 at TJ Maxx. If I was going to stay in this house I would have put a picture above the towel rack, but since it was just for staging purposes, I left it free.  A buyer can imagine their own picture there.

This is a little better picture of the Brown painted vanity.  I used the same hardware that I had used around the house except in brushed nickel.  I was so pleased with this look, I am thinking about doing this to a few of the builder grade vanities in our new house.

Have any of you tried to paint a vanity a different color?  Did you like the result?

Home Stories A2Z

9 squares

I painted one of the walls in my family room chocolate brown and was having trouble figuring out what to put on that wall.  Then I saw this project on Thrifty Decor Chick’s archives and I thought it would be perfect.  I did tweek things a little bit but I pretty much followed her instructions.

I had these boards cut at lowe’s.  I want to give a shout out to the nice man who helped the lady with the baby cut all the squares of particle board.  He could not figure out what I was up to but he gave me way more than the 2 free cuts that the sign said I was allowed.

Then I  went to Micheal’s and found some scrapbook paper that I liked:

I tried to spray paint the edges a blue color so it would stand out from the wall, but it was somewhat of a disaster, so instead I cut strips of a neutral color of the paper and modgepodged them on the sides to cover the particle board (and the blue spray paint mess.) In the end it was a little bumpy but it looked good, so I modgepodged the main paper on the front of all the boards.  The problem was that not all my boards were exactly 12″ x12″ so the fit was not perfect, but I made due.

Then Sarah actually nailed her squares to the wall, hubs said, “No.” to that idea, so I put hangy bracket things on all the backs and put nine nails on the walls.  Everything was measured perfectly and I even used a level, but due to the difference in the board sizes it is not quite perfect.

But I love it!  Hubs not exactly in love (I think engineering brain again) but he will come around.  I like that it adds color to the wall and works with the dark brown.

Another picture just for fun.

I will be down with my family room sooner or later, I swear.  I need to stop procrastinating!

Good night!

Dana

I linked to:
The Shabby Nest

Geometric Pillow

On Friday I had to take a half day to watch the baby and by some miracle she slept for almost the whole afternoon, so I took advantage of this time and attempted to make a pillow I had in mind to try for awhile.

I saw this pillow in the West Elm catalog:

I really liked the idea of he layered felt and I was planning on trying to make it, then I saw the knock off version at Target:

And I actually preferred this one. Since I did not know how this project would go I dug out some felt that I found at my favorite small town thrift store. I found the price tag on the felt:

I had to take a picture of the tag. I bought about a yard of felt for only $.75, what a great deal. I had a pillow that I had made a while back that did not work out and it was a 16″ by 16″. I cut two squares of felt 18″ x 18″. Doing some rough calculations, I figured I would need 3.5″ diameter circles in order to run five across the diagonal. I searched my house with my ruler measuring circular items until I had something with a 3.5″ diameter. The winner was my coffee cup.

I traced approximately 40 circles.

Then I cut them all out. I would recommended some good sewing scissors for this because the better the cut the better the pillow will turn out.

Then I folded one of the large squares of felt on diagonal and measured 1.75″ (Half the diameter of the circles) off center of the diagonal and started my line. Each circle I fold over itself in thirds and sewed it on trying to keep my line as straight as possible. Then where two circles meet I placed another one perpendicular until I had filled my square. I sewed the pillow with the right sides of the fabric facing each other together using a 1″ seam allowance and leaving an opening to stuff the pillow. I trimmed some of the seams, pulled the pillow right side out, stuffed it, and slip stitched the opening closed.

In the end the pattern came out like this:

A little crooked, I know, but a good start. I learned a couple of thing through out this process, first of all measuring would probably be better than guessing and that as I lay down the folded circles, the flap could go one of two ways and the direction of those flaps actually changed the design slightly.

Anyway here is the finished product on my chair and half:

Not bad for $.75 of fun!

If anyone else has attempted this pillow let me know what tips and tricks helped you.

Dana

Home Stories A2Z

Today's Creative Blog

Upstairs Bathroom

Warning! Currently this is the ugliest room in the house, but I feel I need to document it in its present state. (It makes for better before and after pictures, right?)

Here is a picture from house hunting:

Our only update was removing this horrendous 80’s trend:

I really don’t understand the double hanging chain lights. The amazing part is that this light was still present in the house in 2009.

So this is our bathroom in its current state. Notice the peeling border, the 80’s shower doors, the golden oak cabinetry, and white walls. Since this is one of the most used rooms in the house, I’m not sure why I saved it for last to redo.

It looks almost the same, just minus some decorating touches from the previous owner.

My dad helped us switch the light fixture in here to something more modern and we switched out the mirror for one we bought at Gordman’s. I do love my new, tear-drop, white soap dispenser from target for $5.

We have really strange vanities in our house. Under all the sinks the cabinets are sort of concave (I don’t know maybe it’s room for your feet?) Also in this bathroom the sink is not centered, which is a little strange looking but it is nice how much counter space that we gain. We were looking at putting one of those pre-sized solid surface counter tops in here, but none have the sink positioned where ours is so we would either need a custom counter or a new vanity, neither is cheap. So we are kind of just procrastinating on making a decision. I do want to paint my vanity for sure. I was thinking about white like the bathroom downstairs, but I was inspired by Just a girl’s post on her Coastal Bathroom and I was really thinking about painting the vanity dark brown and the rest of the cabinets white.

I love this bathroom. It is so cute and totally my style. We will see if my bathroom comes out anything like this.

Well off to bed, I hope to have a craft post tomorrow.

Dana